Intro to Flutter: a practical guide to cross-platform development
Today I would like to share with you our experience with running our Flutter application in production for about 6 months. We will talk about how to organize your code, which libraries to use and other tips and tricks we’ve learned so far.
This is actually a text version of my online presentation – for those who (like me) prefer reading to watching and listening.
Cross-platform development: are we there yet?
First of all, let’s talk about cross-platform development in general. Why are there so many cross-platform frameworks, why does each framework promise to kill native development, and why, despite all of that, is native development still alive?
Cross-platform development: advantages
Let’s define which advantages we can get when doing cross-platform development.
First of all, it’s of course reusing business logic. We programmers are lazy folk, so if something can be done once, we would like to have it done once. Especially when it comes to business logic – the core of our application, something that should be tested thoroughly and at the same time something that can be changed constantly over time.
Second, reusing UI. Now, this can be a controversial moment and actually some developers and designers can argue that UI should be as strictly adhering to platform guidelines as possible. At the same time it’s pretty common lately to have a unified “branded” UI that is the same across all platforms, and platforms themselves are eliminating differences in both UI and UX.
Faster development cycle. Obviously, if we need to implement a feature only once, it’s faster than to implement it twice. Of course, if we’re speaking about a full development cycle starting from product discovery through design and up to coding, testing and deployment – we won’t get 2x speed up, as there still are some steps that cannot be shared; but there will be a gain in time anyway.
Smaller teams. Maybe, as developers, we’re not interested in having less demand for our services, but tech leads and other managers will definitely consider it as an advantage. And the benefit here is growing at a rapid pace. Managing a team of 3 people is more than 2 times simpler than managing a team of 6 people: with scaling team down intercommunication problems are scaled down faster.
And the last, but not least point: synchronized releases. As you develop a new feature only once, there is a high chance that it can be tested and deployed at almost the same time: almost, because e.g. Apple pre-moderation can take up to several days. And it makes life easier for the marketing team, product managers, and the support team since users have a higher chance of getting the same latest version of your app at the same period of time.
So, is life that beautiful for cross-platform developers? Well, obviously not.
Cross-platform development: drawbacks
Let’s now take a look at drawbacks we can have with a cross-platform approach. First, no matter how good a cross-platform framework can be, we still will have only a subset of features available to native developers. If we want unified experience, then we obviously lose features that are unique to each platform.
Non-native UX. Though it can be solved in some frameworks with different methods, if we start to strictly follow platform UX guidelines we can lose one of the advantages – reusing UI/UX across platforms.
One of the most important problems with cross-platform frameworks – at least with some of them – is a performance penalty. If there will be another abstraction layer, there will be another performance degradation. Or not? Let’s talk about it in a moment.
And the last moment, which is maybe not a drawback, but just a point to keep in mind. Some managers think that 1 cross-platform developer = 1 iOS developer + 1 Android developer. That’s not true, in my opinion. No matter how good a cross-platform framework is, sooner or later there will be some problem in interop with some platform. And at that moment it’s better to have a developer who has a native experience with this platform.
Anyway, it's a never ending discussion – whether cross-platform development is good or bad. The right answer sounds familiar to all architects: it depends. But for now I just assume that you’re at least interested in cross-platform development, so let’s continue talking about it.
Approaches: there are 14 competing standards…
I would like to speak about different “categories” of cross-platform framework that we can find. These are very loose categories divided by the way they deal with UI.
Approaches: hybrid apps
My first category would be frameworks for creating hybrid apps. By that we usually mean a WebView with a common HTML/CSS/JS app that is placed inside some native wrapper which also provides an access to native platform features, e.g. camera or geolocation. These are such frameworks as PhoneGap, Ionic or Onsen UI.
And since it’s just an HTML application inside, it’s very easy for web developers to dive into mobile applications development, or to reuse your web application, or create some prototype.
At the same time the main disadvantages are really bad performance – due to a huge number of abstraction layers – and non-native UI – no matter how hard you try you will hardly make users believe that this is a native app.
Approaches: native UI
Next category, which for convenience I’ve called “native UI”, is presented by such frameworks as Xamarin, React Native or Titanium. Their common feature is that they seamlessly provide you the way to use native UI components in your cross-platform application.
What does it look like? You develop an application in your favorite language – JS/TypeScript/C#. Your business logic can of course be totally shared, and the UI is translated into native UI of each platform.
The disadvantage of this approach is again a performance impact. So not as big as in the previous category, it can still be a problem. For example, Xamarin application requires the whole .Net mono runtime to launch your application. For some old and cheap Android devices it can be a hard burden. React Native also creates a bridge to translate your javascript code into native calls and back – which can be quite expensive, especially when we speak about animations.
Approaches: share business logic
There is another approach, which was taken e.g. by Kotlin Multiplatform framework: it allows you to share your BL written in Kotlin between your Android and iOS app. It will be compiled for JVM runtime for Android and into native code for iOS app, which we can call from Swift code thanks to interop feature without any significant performance impact. Both an advantage and drawback (depending on the way you look at it) of this approach is that you have to implement UI for each platform separately, using native methods.
Approaches: Flutter
And now let’s talk about the approach that was chosen by the main hero of this article. Strictly speaking this approach is not unique: there is at least another one framework I know with the similar way: it’s Kivy – cross-platform framework in Python.
The main idea is that the framework does all the UI rendering on its side (slightly similar to our first category), but using a high performance rendering engine under the hood. In case of Flutter it’s Skia: an open-source 2D graphics library that serves as the graphics engine for Google Chrome and Chrome OS, Android itself and some other products.
So, what do we gain when using Flutter? We can share code for our business logic – well, that’s obvious. Next, we can share UI – as the rendering is done by the framework, we have a number of options here: to have unified UI across platforms, to use natively looking components on each platform or even some crazy combination, such as Cupertino components on Android and Material components on iOS (yeah, it can sound weird, but we actually use this mix in our UI library – some of our components are based on Material ones, while another on Cupertino).
Yes, it's worth noting here that these components are not native ones – they only look like native components, but they were implemented from scratch in the default library.
What else? As I’ve already mentioned thanks to this graphics engine we can get a very high performance of 60 FPS even for complex animations.
And because all the components are implemented from scratch, we get a really nice UI system built on composition over inheritance and functional composition principles. As for me this UI system is really great, compared to iOS and especially the Android system of widgets and views.
And the last point, and the most controversial one. Flutter is using Dart language, and so will you. I know some people who hate this language, I didn’t have any good feelings about it as well at the beginning, but now I even start to like some of its features. Well, maybe it’s just a Stockholm syndrome.
Anyway, let’s now talk about Flutter in Mews.
Flutter in Mews: love story…
In Mews we love Flutter. And I’m not only speaking for myself, honestly. We use it for developing a light mobile version of our PMS: the one that I’ll be talking about in a moment.
Another Flutter project that I’ve already mentioned is the UI library. We have big plans about open-sourcing it in the near future, so stay tuned.
We are also using Flutter for different side projects: both to play with Flutter and to try some approaches that can be incorporated into our main app.
And we are actively participating and organizing different meetups and workshops about Flutter, and writing blog posts.
So let’s now talk about our main Flutter application.
Flutter in Mews: Commander
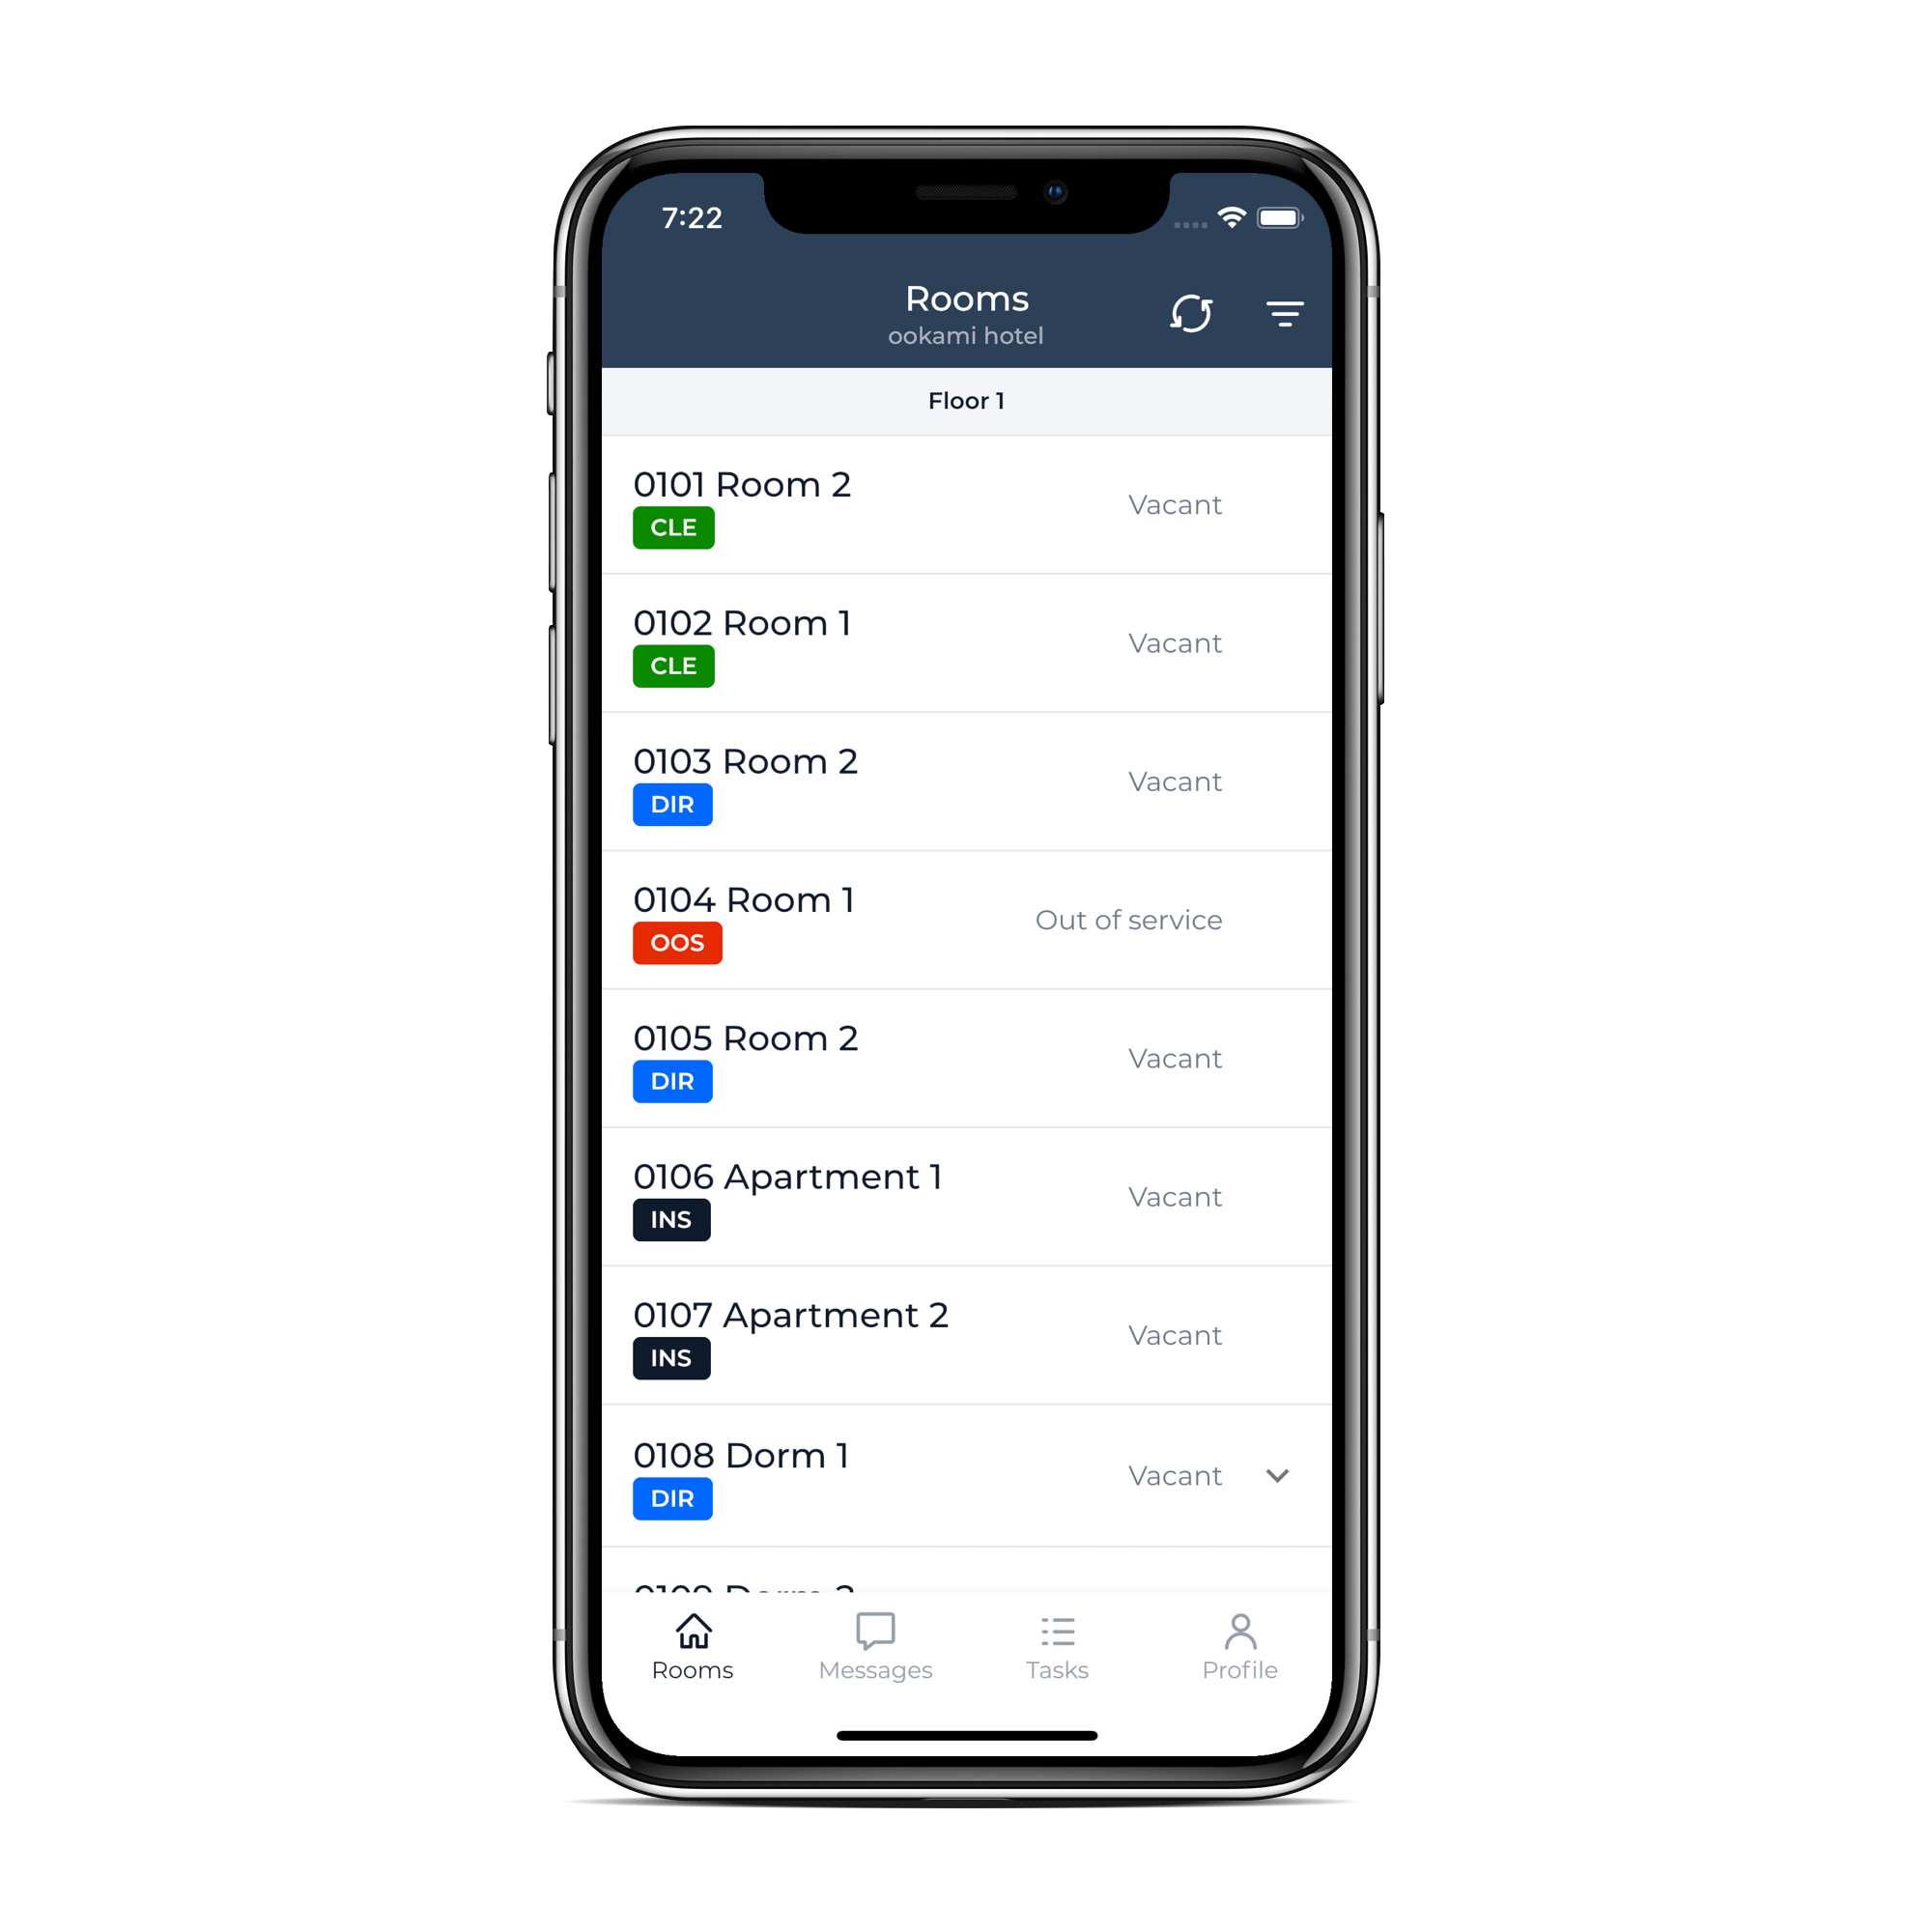
This app is a light version of our PMS that is for now mainly used by housekeepers and maintenance staff. From the developer point of view it implements the common set of features of business applications: calling APIs and displaying dynamic forms, receiving real-time updates via push notifications and websockets, managing localisations and so on.
Speaking of the team, we can say it was built by 1.5 developers. Originally it was only me, then we’ve got another developer, but at the same time I was doing other tasks and didn’t take an active part in development, mainly in code review.
The development started in April 2019 – we had an old version of this app written natively in Java for Android and Swift for iOS – but it was not actively developed and the Android version required some major refactoring, so we decided to rewrite it from scratch in Flutter.
The first public release was in September 2019 and it’s still under active development – we’re releasing a new version of the app roughly each 2-weeks (once per sprint).
Currently, we have only about 3K active users monthly, but we have a lot of plans to improve it, so we’re steadily growing our user base.
So, what have we learned so far, having this app in production for about half a year? First, let’s talk about the most useful libraries we’re using there and in pretty much every other Flutter project, either big or small.
Libraries to use without going into dependency hell…
Libraries to use: RX
dependencies:
  rxdart: ^0.24.1
If there is a family of libraries that doesn’t need any introduction, then it should be Rx*. You probably know its implementations for different languages such as RxJava and RxKotlin, RxSwift, RxJS. Dart is not an exception here and we have a rxdart library. Though there are built-in streams in Dart and many concepts in Flutter are built around Streams, this library gives a lot of extensions and helper functions on top of these native streams and is highly recommended, especially if you were using other implementations before.
Libraries to use: immutability
dependencies:
  built_collection: ^4.2.2
  built_value: ^7.0.8
  built_value_generator: ^7.0.8
Functional programming and its immutable models as first class citizens are in trend now, and as Flutter incorporates many ideas of functional programming, it seems natural to go with immutable models – they really help a lot with tackling the complexity of your business logic.
Unfortunately, unlike let’s say Kotlin data classes, Dart doesn’t have immutable models out of the box. Luckily, we have libraries that take off some overhead in creating immutable objects: built_collection and built_value.
Let’s see how we can use this library in our code:
abstract class Floor implements Built<Floor, FloorBuilder> {
  factory Floor([Function(FloorBuilder b) updates]) =>
      _$Floor((b) => b..update(updates));

  Floor._();

  String get floorNumber;

  BuiltList<Space> get spaces;
}
Although it still seems to be rather verbose, some of this boilerplate can be managed by live templates, and we can focus on the main part of it:
abstract class Floor {
  String get floorNumber;

  BuiltList<Space> get spaces;
}
We’re just defining an abstract class and a number of getters and the library will generate a code with all the functionality for let’s say copying our object with partially changed properties. This is how it can be used:
final newFloor = floor.rebuild((b) => b..floorNumber = '1F');
If you’re familiar with Kotlin data classes, you can see some resemblance:
val newFloor = floor.copy(floorNumber = "1F")
Actually this library gives us even more flexibility, because it implements a Builder pattern under the hood that supports all the nested structure if you have a hierarchy of immutable objects and collections.
Libraries to use: JSON
dependencies:
  json_annotation: ^3.0.1
  json_serializable: ^3.2.5
Another moment that will inevitably arise in any app that is dealing with API: serializing and deserializing JSON. Though the built_value library can handle this as well, we found it rather verbose for that. Also DTOs are even more “immutable” – if you need to partially copy DTO objects, then you’re probably doing something wrong.
That’s why for DTOs we actually use a more lightweight library: json_serialization. It is also based on code generation principle and creates code for implementing toJson and fromJson methods. This is how your DTO can look like:
()
class MessageDto {
MessageDto({this.id, this.createdUtc, this.text, this.creator});
final String id;
final String createdUtc;
final String text;
final MessageAuthorDto creator;
static MessageDto fromJson(Map<String, dynamic> json) =>
_$MessageDtoFromJson(json);
Map<String, dynamic> toJson() => _$MessageDtoToJson(this);
}
Again it can look a little verbose, but it can be solved with live templates as well. We can focus on the properties only, also in the majority of cases you need either fromJson or toJson, but not both of them.
This is how it can be used:
final Response<Map<String, dynamic>> _result = await _dio.request(…);
final value = MessageDto.fromJson(_result.data);
Actually, you won’t probably write this code manually, as it can (and should) be generated by our next candidate.
Libraries to use: API
dependencies:
  dio: ^3.0.7
  retrofit: ^1.0.1+1
  retrofit_generator: ^1.0.1+1
If you have an experience in native Android development, I bet you know OkHttp and Retrofit libraries. Authors of these libraries know them for sure, and thanks to them we have dio and retrofit libraries for Dart, which are working in a very similar way.
All you need to do in order to implement an API client, is to define an interface like this:
()
abstract class RestClient {
factory RestClient(Dio dio) = _RestClient;
('/api/general/v1/users/signOut')
Future<EmptyResponse> signOut(() SignOutRequest request);
}
()
class EmptyResponse { … }
()
class SignOutRequest { … }
And the nice thing is that this library goes perfectly with the previous json_serialization library, so your DTOs like EmptyResponse or SignOutRequest here can be annotated with @JsonSerializable and retrofit library will take care of proper serialization and deserialization.
So we can easily use this client, let’s say, in our AuthenticationManager that implements a higher level functionality:
class AuthenticationManager {
  AuthenticationManager(this._restClient);

  final RestClient _restClient;

  Future<Either<Exception, void>> logOut() =>
      _restClient.signOut(SignOutRequest()).toEither();
}
Libraries to use: DI
dependencies:
  provider: ^3.0.0+1
And our last category of patterns that always comes out while aiming towards a clean architecture is dependency injection. There’re several libraries to choose from for that, our choice is provider. It’s actually a mix of state management and dependency injection library, but we’re using it for DI only.
We've also experimented with inject.dart – you can read about it here – but I wouldn't recommend it now, as it's not really FLutter way.
As pretty much everything in Flutter is a widget, this library is not an exception. It’s a wrapping widget that gives you the way to define value or factory providers and later retrieve them in the underlying widgets.
Widget build(BuildContext context) => MultiProvider(
providers: [
Provider<RestClient>.value(value: _restClient),
Provider<MessagesRepository>.value(value: _messagesRepository),
Provider<ThreadDataLayer>.value(
value: ApiThreadDataLayer(
_restClient,
() => _imageUrlProvider.baseImageUrl().first,
),
),
],
child: …
);
Let’s say we have a MessagesBloc that is dependent on MessagesRepository and RestClient:
class MessagesBloc {
  MessagesBloc(
    this._repository,
    this._restClient,
  );

  final MessagesRepository _repository;
  final RestClient _restClient;
}
Somewhere in the widget (let’s say it’s MessagesScreen) we’re creating our BLoC and pass the dependencies we’ve retrieved from the provider:
_messagesBloc = MessagesBloc(
  Provider.of<MessagesRepository>(context),
  Provider.of<RestClient>(context),
);
Yeah, it’s sort of a so-called Poor Man’s DI and we can go in a more complex way to eliminate the need for creating BLoC manually, but so far we are ok with this approach.
Actually, thanks to Dart’s type inference system, that code can be made even shorter. As compiler knows what types are expected in constructor, we can omit generic types declarations:
_messagesBloc = MessagesBloc(Provider.of(context), Provider.of(context));
Just keep in mind that this code can look rather confusing, so it’s up to your team to decide whether you want to use this functionality.
Architecture / Structure: 10,000 foot overview
Let’s now talk about building an architecture and defining proper structure for your application. As this can actually be a theme of several other articles, I’ll try to keep it really short and discuss only the general points.
Structure
Speaking of structure, there are 2 ways of organizing your code: horizontal and vertical.
Horizontal structure assumes that on your top level you have folders according to the functionality of classes inside: e.g. models, blocs and widgets:
📁 models
  message.dart
  thread.dart
  profile.dart
📁 blocs
  messages_bloc.dart
  profile_bloc.dart
📁 widgets
  messages_screen.dart
  profile_screen.dart
This can be tempting to structure your code like that in the very beginning, as it’s easy to define which folder your file belongs to. The problem is that this structure becomes rather messy with the growth of your code base, and to change something in one module, let’s say messages, you will have to go through multiple top-level folders.
That’s why we prefer vertical structure, where your code is organized according to the use-case of the module. So on the top level we can have folders such as “profile”, “messages” etc. Inside these folders we can have nested sub-modules, extract shared models into a sub-folder or keep it as a flat list in a simple case:
📁 profile
  profile.dart
  profile_bloc.dart
  profile_screen.dart
📁 messages
  📁 models
    message.dart
    thread.dart
  messages_bloc.dart
  messages_screen.dart
Let’s say in our app we have a “messages” module. It means that we will have a top-level “messages” folder. For threads screen we will use shared models, messages repository and screen-specific code will be located in the “threads” folder.
📁 messages
  📁 create_thread
    create_thread_bloc.dart
    create_thread_screen.dart
  📁 models
    message.dart
    message_author.dart
    message_thread.dart
  📁 thread_details
    thread_details_screen.dart
    thread_details_bloc.dart
  📁 threads
    threads_bloc.dart
    threads_screen.dart
    threads_tab.dart
  messages_repository.dart
When we go to a new thread screen, we’re still using these models and messages repository, and screen specific code is located in the “create_thread” folder.
Architecture
As Flutter is primarily a UI framework, it doesn’t force you to use some specific architecture pattern, so you’re free to use any of existing ones or invent your own. At the same time there’s a pattern that’s becoming a standard de facto in Flutter development: BLoC (Business Logic Component). The idea is rather simple and similar to redux pattern: you have a BLoC component that provides you an output stream of states and an input stream where you can send some events. BLoC transforms this incoming stream of events into an outcoming stream of new states. And the widget is supposed to consume a stream of states and send events.
We’re using some mix between pure BLoC model and MVVM approach: our BL component defines a number of observable properties and exposes a set of methods that widget can use.
It's worth noting here that we've started developing our application in April 2019, when there was no unified opinion about building the architecture. As for now I would recommend going with BLoC library which has a nice documentation and examples (I cannot say that it's now the only way to build your architecture, but BLoC approach in general, and this library in particular, is one of the most popular options). We're currently updating our app to use this library. Nevertheless, most of the points in this section make sense with this library as well.
So in the center of it there is a view model that communicates with the widget. Widget knows only about its own view model. It listens to observable properties and builds UI of them, and uses methods of view model to send events. A view model in a simple case can change observable properties based on these events.
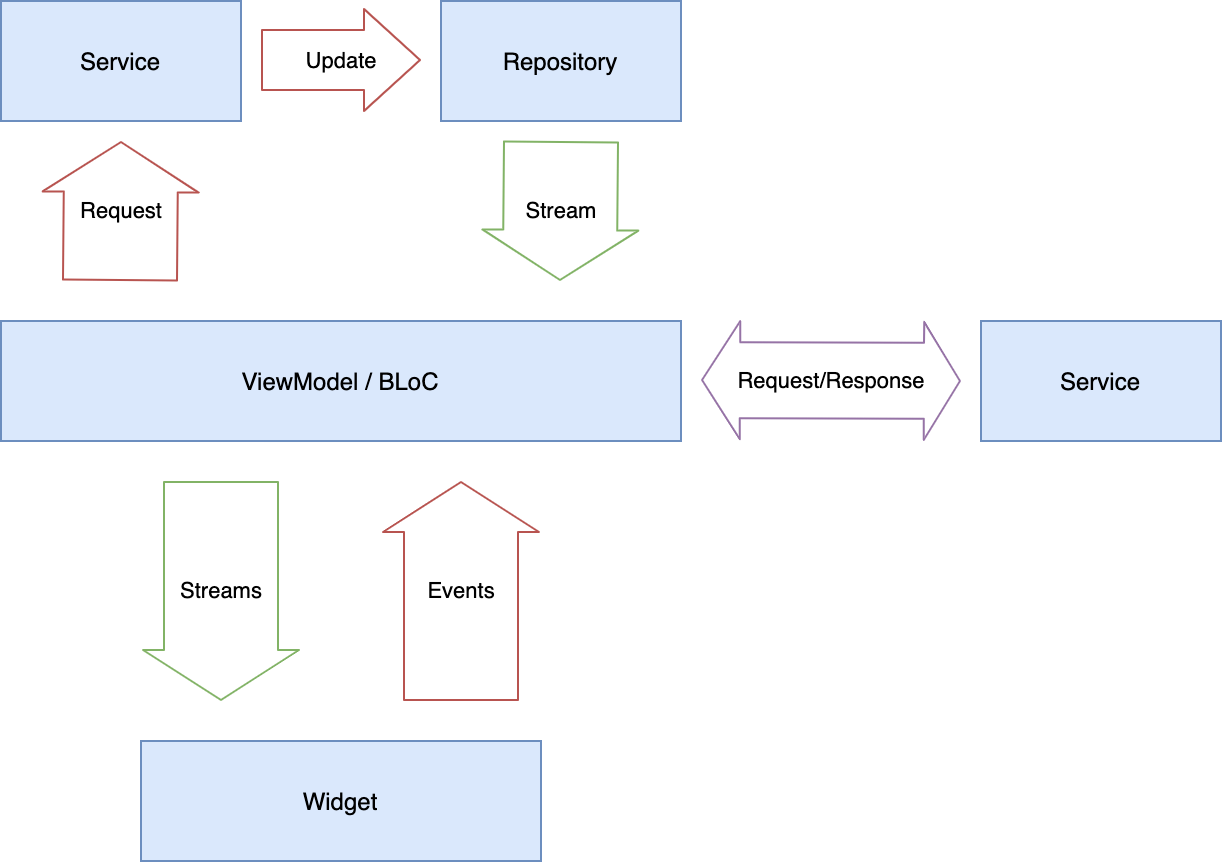
In a more complex case view model can use some service (e.g. an API service) to retrieve some data. It sends a request and receives a response (it can be both synchronous and asynchronous request).
Based on the response of the service, some of its observable properties can change and these changes will be propagated to the widget.
Another option for a view model is to “fire and forget” some request to a service. After this request is processed, service can update a repository, which exposes its state via stream as well. View model listens to this repository state and updates its data for the widget if necessary.
In this case the widget again receives an updated state. In any case widget knows only about its view model, view model knows about repositories and services and the latest ones know nothing about widgets and view models. That allows to build a cleaner architecture, where high levels don’t depend on low levels.
Let’s say we have a "create message thread" screen and there’s an input field with the title of the thread. BLoC provides us a stream of strings with the current title value, so we connect to this stream on widget initialization and with each update force title controller to use the new value:
class CreateThreadScreen extends StatefulWidget {…}
class _CreateThreadScreenState extends State<CreateThreadScreen> {
void afterInitState() {
super.afterInitState();
bloc.title
.map((v) => _titleController.value.copyWith(text: v))
.listen((v) => _titleController.value = v, onError: ignore)
.addTo(_subscriptions);
}
}
In that case our BLoC can contain such a code:
class CreateThreadBloc extends BlocBase {
  /// Title of the conversation
  Stream<String> get title => _title.transform(emptyValidationTransformer);
  final BehaviorSubject<String> _title = BehaviorSubject.seeded('');

  /// Creates new message thread or updates existing one.
  Future<Either<Exception, MessageThread>> submit() async {
    Either<Exception, MessageThread> result;
    if (initialThread == null) {
      result = await _createThread();
    } else {
      result = await _updateThread();
    }
    return result;
  }
}
For the title stream we are actually using behavior subject under the hood, but we expose only a stream, so that client (widget) cannot change it directly, only through a predefined interface.
And let’s say we need some method to submit a thread to the server. It can be either creating a new thread or updating an existing one.
Creating a new thread can look like this – we prepare some data and call a method from data layer:
Future<Either<Exception, MessageThread>> _createThread() async {
    final selectedEmployees =
      _selectedEmployees.value.map((employee) => employee.id).toList();

    return data.createNewThread(_title.value, selectedEmployees).map((thread) {
      repository.saveThread(thread);
      return thread;
    });
  }
Data layer provides another abstraction layer of the REST client. Since communication with a server is an infrastructure task, our business layer shouldn’t depend on it, also we would be able to unit test the business layer without providing or mocking REST clients.
abstract class ThreadDataLayer {
  Future<Either<Exception, MessageThread>> createNewThread(
    String subject,
    List<String> employeeIds,
  );
}
That means we can define an interface – actually, an abstract class since Dart doesn’t have an interface keyword – that will abstract over thread creating.
This interface can be placed into the module with the view model itself, since it’s just an abstract dependency for our business logic. We can easily implement a stub class for our unit tests. For a real application we need real communication, so we can create an ApiThreadDataLayer that depends on RestClient and does real API calls. As this is an implementation detail, we can place this class somewhere in the infrastructure level:
class ApiThreadDataLayer implements ThreadDataLayer {
final RestClient _restClient;
Future<Either<Exception, MessageThread>> createNewThread(…) async {…}
}
These are the most important libraries that we’re using almost for each Flutter project. Of course there are tons of them implementing UI widgets, native plugins and so on, making a detailed review is out of the scope for this presentation, so let’s continue with other tips that can be useful for a production-ready app.
Other tips. TLDR: do it well
Code style
Code formatting can be a very arguable topic. But as they say in the army: there are 2 opinions – one is mine, another is wrong. This is the position of a built in dart formatter: there is only one right way to format your code.
And if you accept this position you can actually make your collaboration and code reviewing easier, like we did by setting up CI server. If any of the files in PR is not formatted correctly from the dartfmt point of view, the build will fail and you cannot merge it into master branch.
This code, for example, looks ok to me:
class SharedPrefTokenRepository implements TokenRepository {
Future<void> save(String token) async =>
(await SharedPreferences.getInstance())
.setString(_keyToken, token);
Future<String> load() async => (await SharedPreferences.getInstance())
.getString(_keyToken);
static const String _keyToken = 'token';
}
But dartfmt says that it should be formatted in a different way:
class SharedPrefTokenRepository implements TokenRepository {
Future<void> save(String token) async =>
(await SharedPreferences.getInstance()).setString(_keyToken, token);
Future<String> load() async =>
(await SharedPreferences.getInstance()).getString(_keyToken);
static const String _keyToken = 'token';
}
Static analysis
Another moment that can greatly help you with catching hidden bugs and unifying code style is static analysis, and luckily we have a built in analyzer as well. Though by default it’s too kind, as for me. That’s why we went through most of its rules and defined our own importance levels for them.
Some of them we defined as warning, it means that IDE will mark them with yellow color, but, unlike errors, warnings won’t prevent you from running and hot reloading your app. That’s very convenient, because things like not closed sinks or empty statements can happen while you’re experimenting with your code and you don’t usually want to waste your time to prettify your churn code.
At the same time CI server runs analysis as well, and will fail the build if it contains errors or warnings, so before requesting a code review you will need to take care of them.
Extract widgets
When you start developing with Flutter, you can often come to a situation with a bloated build method that contains a lot of nesting:
Widget build(BuildContext context) => Scaffold(
body: SingleChildScrollView(
child: Padding(
padding: const EdgeInsets.symmetric(horizontal: 16),
child: Column(
children: <Widget>[
Padding(
padding: const EdgeInsets.only(top: 145, bottom: 102),
child: SvgPicture.asset(
'assets/mews_logo.svg',
height: 28,
width: 136,
),
),
StreamBuilder<String>(
stream: bloc.email,
builder: (context, snapshot) => MewsInputField(
textInputAction: TextInputAction.next,
onSubmitted: (_) {
FocusScope.of(context).requestFocus(_passwordFocus);
},
label: _translate(TranslationKey.UserNameOrEmail),
placeholder: _translate(TranslationKey.UserNameOrEmail),
onChanged: bloc.onEmailChanged,
keyboardType: TextInputType.emailAddress,
error: (snapshot.error as ValidationError)?.message,
isRequired: true,
),
),
Padding(
padding: const EdgeInsets.only(top: 24),
child: StreamBuilder<String>(
stream: bloc.password,
builder: (context, snapshot) => MewsInputField(
enableInteractiveSelection: true,
textInputAction: TextInputAction.go,
onSubmitted: (_) => _logIn(),
focusNode: _passwordFocus,
isPasswordField: true,
label: _translate(TranslationKey.Password),
placeholder: _translate(TranslationKey.Password),
onChanged: bloc.onPasswordChanged,
error: (snapshot.error as ValidationError)?.message,
isRequired: true,
),
),
),
Padding(
padding: const EdgeInsets.only(top: 40),
child: MewsFillButton(
minWidth: double.infinity,
onPressed: _logIn,
text: _translate(TranslationKey.SignIn),
),
),
Padding(
padding: const EdgeInsets.only(top: 16),
child: StreamBuilder<Environment>(
stream: _environmentBloc.environment,
initialData: Environment.production,
builder: (context, snapshot) => MewsGhostButton(
minWidth: double.infinity,
text: 'Environment: ${snapshot.data.name}',
onPressed: _displayChangeEnvironmentDialog,
),
),
)
],
),
),
),
);
So when it comes to building a layout, main advice is to keep your build method flat and readable. For example with a minimum effort this code can look much better:
Widget build(BuildContext context) => Scaffold(
body: SingleChildScrollView(
child: Padding(
padding: const EdgeInsets.symmetric(horizontal: 16),
child: Column(
children: <Widget>[
const _Logo(),
_buildEmailField(),
_buildPasswordField(),
_buildSubmitButton(),
_buildChangeEnvironmentButton()
],
),
),
),
);
One option is to extract some part of your code into a separate widget. And if it doesn’t depend on properties of your parent widget you can even declare it a constant and gain a performance improvement.
If it’s not possible or doesn’t seem to be reasonable you can at least define some helper build methods that will improve readability.
Logging
When we’ve rewritten our app with Flutter, we’ve got this picture in Crashlytics:
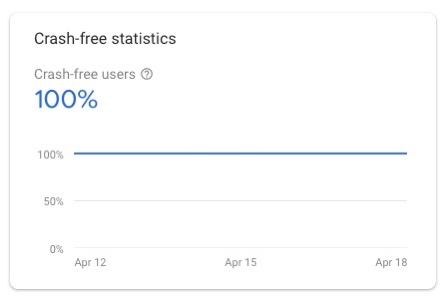
This doesn’t mean of course, that we’ve become perfect developers or that Flutter doesn’t allow you to make any error in your code. It’s about the way Flutter works: it’s actually very hard to make Flutter app crash. It can crash if there’s an error in native plugin or in native part of Flutter itself, but errors in your Dart code will trigger a red screen of death in debug mode, and be swallowed in production.
It can be both an advantage and a drawback: yes, users won’t probably see your app crashing, but at the same time if you have an error while displaying a modal loader dialog, a user has a chance to be stuck at this screen forever.
That’s why for a production app it’s crucial to have a proper logging system. For our project we’re using the same stack as other platforms in Mews: Sentry for error reporting and InsightOps for all the logging. You can set up your Flutter app to use these systems pretty easily.
dependencies:
  logging: ^0.11.3+2
  sentry: ^2.2.0
  insightops_dart: ^0.0.6
await runZoned<Future<void>>(
  () async => runApp(app),
  onError: _reportError,
);

FlutterError.onError = (FlutterErrorDetails details) {
  Zone.current.handleUncaughtError(details.exception, details.stack);
};
That’s it! Of course, each of these sections can be discussed in a separate article (or even a book), so if you’re interested we can continue with this how-to series and share our experience in creating cross-platform apps that can be even better than native ones.